I recently decided to publish a paid-but-open-source application for getting data off of Android devices and into S3 buckets.
Unfortunately, Google have added so many restrictions and requirements to the awful Play Store that it's essentially impossible for new individuals to publish to the store. The ecosystem is so deliberately dysfunctional that there are now commercial companies set up who will fight through the insanity for developers for a fee.
I'm not doing any of that. I decided instead to publish the application on F-Droid and provide a Liberapay link should anyone wish to throw some coins at me.
Unfortunately, I've had reports that the donations don't actually work. Liberapay's Stripe integration repeatedly failed with an error, and Liberapay and Stripe's support channels each blamed each other. I did successfully set up the PayPal integration, which is to say that Liberapay claims the integration is correctly set up. Unfortunately, anyone trying to donate via PayPal will (after the payment sits in the pending state for several weeks) have their donation returned claiming that I (the receiver) don't have a PayPal account. I even received an email, from PayPal, via my PayPal account, telling me that I don't have a PayPal account.
I'll be looking at alternatives in the new year.
Note: Prices aren't static, and everything written here will likely be invalid inside a year. The analysis process was fun, though, and would work regardless of how prices change.
I'm about to replace an existing backup storage server. The existing server has a simple ZFS array consisting of two mirrored 2TB disks, and was built in 2018. An analysis of my usage patterns shows that I produce around ~50GB of data per year that's significant enough to be included in backups. I only back up data that I've created and that can't be reproduced. I never back up entire operating systems and/or applications; that's wasteful and pointless - those things can easily be downloaded again later.
I generally plan backup systems around ten year forecasts, so I actually only need to expand by 500GB to provide space for the next ten years of backups. The trend line for data use seems to be getting steeper over time, however. Storage is cheap, so it seems to be a good idea to build a new system that's more than just 500GB larger. Disk prices and sizes in 2024 are drastically different to how they were in 2018 when the old system was built, so it likely makes little sense to simply double the storage capacity in the new system.
What's the most cost-effective amount of storage to buy, though?
Heterogeneity
When I buy multiple disks, I deliberately spread the purchases across as
many manufacturers as possible. Why? Consider the case where you're building
a RAIDZ
pool. In a RAIDZ pool, a configurable number of disks are essentially
configured as parity disks, and in a RAIDZN pool, N + 1 disks have
to fail simultaneously in order for the pool to be lost. If failed disks
are replaced before the limit is reached, no data loss occurs.
Let's assume you build a RAIDZ pool using three disks of the same model
from the same manufacturer, and let's assume that those disks all come from
the same manufacturing batch. Now let's assume that that particular batch
from the manufacturer has some kind of contamination issue or manufacturing
defect… You run the risk of that defect causing all three disks to fail at
the same time.
By buying disks from different manufacturers (or perhaps even just different models of disks from the same manufacturer, if there are more disks being purchased than there are manufacturers), you effectively distribute the risk of failure. It's much less likely that two disks from completely different sources and manufacturing processes are going to fail at the same time.
Backblaze publish regular articles on disks failure rates in their arrays. The annualized failure rates for disks is still in the single-digits.
Pricing
Let's take a look at NAS hard disk prices at the time of writing from Scan. We'll analyze prices of NAS disks from each manufacturer and look at their cost per terabyte. We'll ignore any kind of "on sale" pricing, and we'll ignore open box and/or refurbished disks.
The point isn't necessarily to be able to say "this manufacturer has better pricing than this other manufacturer", but to see how individual manufacturers set prices within their own product ranges. I'm likely going to be buying from all of them regardless in order to ensure a heterogeneous pool, but there might be an obvious "best" way to spend money within a given manufacturer.
We're only interested in HDDs and not SSDs (we need large and cheap, not fast), and we'll ignore any disks smaller than 1TB. Additionally, if a manufacturer has multiple models with similar specs and the same size, we'll pick the cheapest purchase price (even if this is a higher price/TB); this is a backup system with redundant disks and no performance requirements so we don't care about fancy disk features.
Seagate
Data: seagate.csv
A chart of the pricing of Seagate disks is as follows (smaller is better):

The same chart without the purchase price, for ease of readability:

The cheapest disk is the 1TB Seagate IronWolf ST1000VN008 at £59.99. The
most expensive disk is the 22TB Seagate ST22000NT001 IronWolf Pro at
£439.99. However, looking at price per TB, it is most cost-effective to
buy 12TB disks as this works out to around £19 per TB. Interestingly, at
no point is it ever a good idea to buy a 3TB disk; the 4TB disk is both
cheaper in price and cheaper in price per TB! If you don't need a 12TB
disk, the 4TB disk is the most cost-effective option for small storage.
Western Digital
Data: western_digital.csv
A chart of the pricing of Western Digital disks is as follows (smaller is better):

The same chart without the purchase price, for ease of readability:

The cheapest disk is the 2TB WD Red Pro WD2002FFSX at £98.99. The
most expensive disk is the 22TB WD Red PRO WD221KFGX at
£575.99. However, looking at price per TB, it is most cost-effective to
buy 6TB or 16TB disks as this works out to around £23 per TB.
Interestingly, the 2TB and 4TB disks are priced identically, resulting in
an effective 50% discount for buying the 4TB disks.
Toshiba
Data: toshiba.csv
A chart of the pricing of Toshiba disks is as follows (smaller is better):
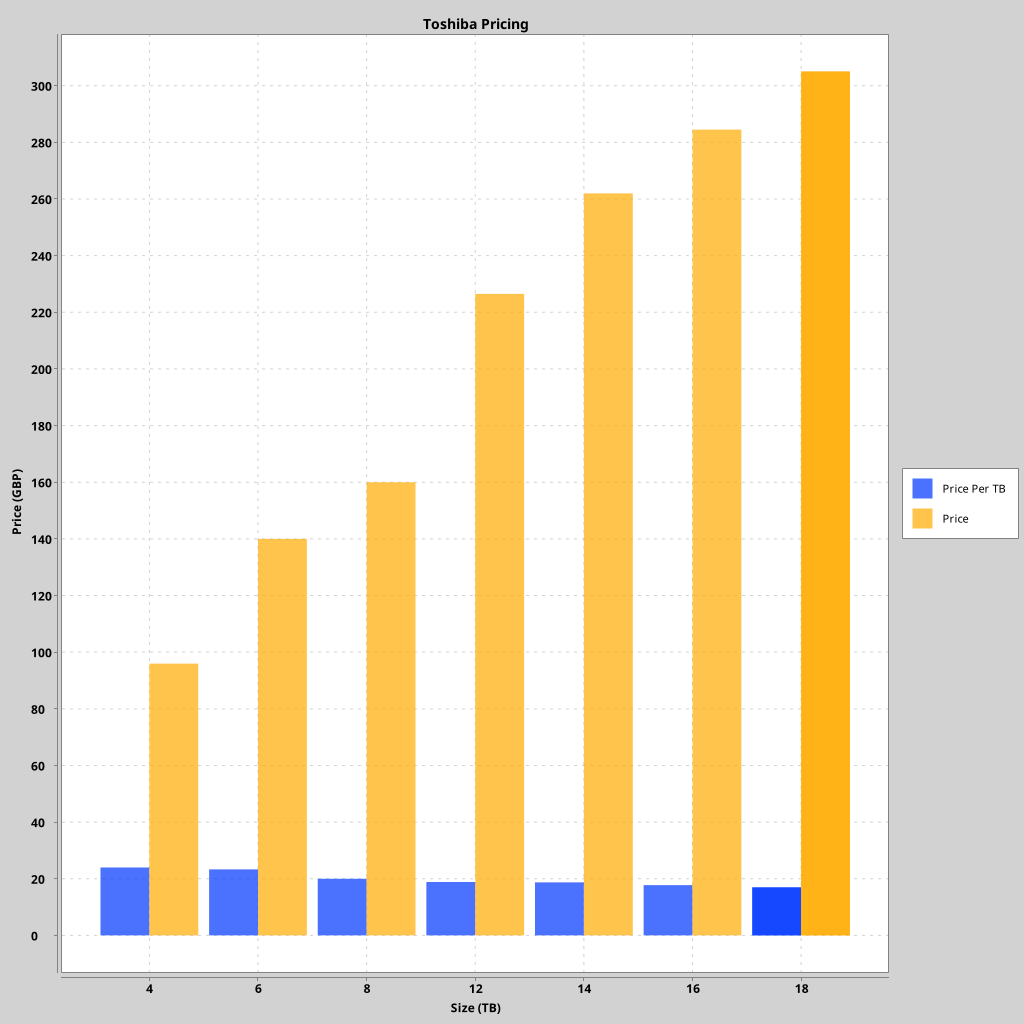
The same chart without the purchase price, for ease of readability:
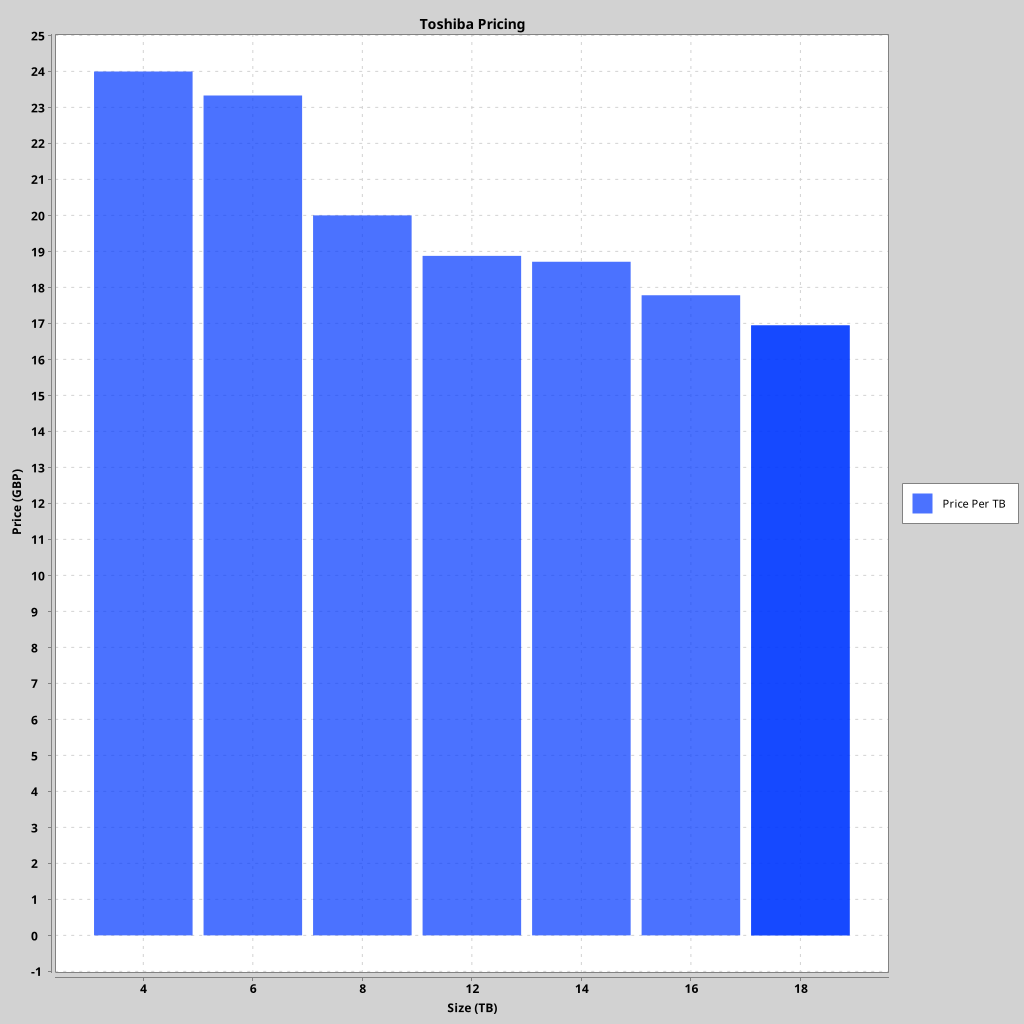
The cheapest disk is the 4TB Toshiba HDWG440UZSVA at £95.98. The
most expensive disk is the 18TB Toshiba HDWG51JUZSVA at
£304.98. The price per TB is straightforward for this manufacturer: Bigger
is cheaper per TB, and there's far less variation in price/TB between disk
sizes.
Synology
Data: synology.csv
A chart of the pricing of Synology disks is as follows (smaller is better):

The same chart without the purchase price, for ease of readability:

The cheapest disk is the 4TB Synology HAT3300-4T at £109.99. The
most expensive disk is the 20TB Synology HAT5310-20T at
£899.99. The price per TB is straightforward for this manufacturer: Bigger
is cheaper per TB, and there's far less variation in price/TB between disk
sizes. However, overall prices for these disks are far higher than for other
manufacturers.
All
For fun, here are all manufacturers on a single graph. Not all manufacturers have disks for every possible size.


The cheapest possible price per TB is to buy a Toshiba 18TB disk. Synology disks are consistently the most expensive disks in both up-front cost and cost per TB. I don't know why anyone would buy a Synology disk: Are Synology NAS devices restricted from using anything other than Synology disks?
Buying anything smaller than a 4TB disk from any manufacturer is consistently a poor choice.
Bean Counting
For my requirements, eyeing the graphs, buying 6TB disks seems like an acceptable compromise across all manufacturers for price per TB vs total purchase price for all disks. Buying 8TB disks looks to be a close second, but Western Digital's odd spike in price per TB for disks at that size makes it seem like a less attractive option.
Let's see if using 6TB or 8TB disks would yield better economy.
For a single set of 6TB disks:
WD 6TB        139.99
Seagate 6TB   148.99
Toshiba 6TB   139.99
              ------
             £427.98  (£35.665 per TB of usable space [Price / 12TB])
Running in a RAIDZ1 configuration, this would yield 12TB of usable storage space (because, effectively, an entire disk's worth of storage is used for parity data). Two disks have to fail simultaneously for us to lose data, and we hedge against this by using disks from three different manufacturers.
For a set of 8TB disks:
WD 8TB        213.49
Seagate 8TB   169.99
Toshiba 8TB   159.99
              ------
             £543.47 (£33.966875 per TB of usable space [Price / 16TB])
Running in a RAIDZ1 configuration, this would yield 16TB of usable storage space.
Is the extra 4TB of storage space worth the extra cost? In other words, how does the extra 4TB of space compare in terms of cost per terabytes to our existing cost per terabytes?
£543.47 - £427.98 = £115.49
      16TB - 12TB = 4TB
    £115.49 / 4TB = £28.8725 per TB
It is fairly economical. If we buy the larger disks, we're effectively paying only ~£29 per terabyte of extra space.
What's the story if we buy six disks at 6TB or 8TB? After all, we would then
be able to create a RAIDZ2 pool (meaning three disks would have to fail at
the same time in order for the pool to be lost instead of only two). That
would yield either 24TB or 32TB of usable space.
WD 6TB        139.99
WD 6TB        139.99
Seagate 6TB   148.99
Seagate 6TB   148.99
Toshiba 6TB   139.99
Toshiba 6TB   139.99
              ------
             £857.94  (£35.7475 per TB of usable space [Price / 24TB])

WD 8TB        213.49
WD 8TB        213.49
Seagate 8TB   169.99
Seagate 8TB   169.99
Toshiba 8TB   159.99
Toshiba 8TB   159.99
              ------
            £1086.94  (£33.966875 per TB of usable space [Price / 32TB])
Obviously, the cost per terabyte is the same as we're just multiplying prices by a constant factor.
If we assume that two disks from the same manufacturer have exactly equal likelihood of failure (which may or may not be true!), then intuitively the six disk array is safer as, even if an entire manufacturer batch catastrophically fails, we still have to lose another disk at the same time (which is guaranteed to be from a different manufacturer) before we lose data.
Is a price difference of £543.47 (or £427.98) worth the extra safety? For a backup system, I think it probably is, and the extra storage space is nice to have too.
There's a lot of literature on filtering pixel art in modern rendering engines. The basic issue is that we want to use nearest-neighbour filtering in order to preserve the sharp, high-contrast look of pixel art, but doing so introduces an annoying shimmering effect when the images are scaled and/or rotated. The effect is almost impossible to describe in text, so here's a video example:

The issue can be seen in a still image if you know what to look for. Here's the frame of the video where the character is rotated:

Zooming in:

The basic issue is that, as the texture is scaled up in order to be displayed in a large area onscreen, the individual texels that make up the texture are mapped to large ranges of the small pixels that make up the screen. As the edges formed by the texels rotate, a clear stepping pattern emerges that changes from frame to frame as the image rotates.
One way to combat this shimmering effect is to use bilinear filtering instead of nearest-neighbour filtering. This eliminates the shimmering effect entirely, but also obliterates the nice sharp aesthetics of the original pixel art:

As mentioned in the article above, it's possible to write GLSL shaders (or code in your shading language of choice) to implement so-called fat pixels.
Essentially, the sampling of texels from a texture is performed using bilinear filtering, but the actual texture coordinates used to sample from the texture are subtly adjusted such that the actual filtering only occurs on the very edges of texel boundaries. This is the best of both worlds: The edges of texels are filtered to eliminate shimmering, but the image remains sharp and is not blurred.
Example code taken from the article to implement this is as follows:
vec2 uv_iq( vec2 uv, ivec2 texture_size ) {
    vec2 pixel = uv * texture_size;

    vec2 seam = floor(pixel + 0.5);
    vec2 dudv = fwidth(pixel);
    pixel = seam + clamp( (pixel - seam) / dudv, -0.5, 0.5);

    return pixel / texture_size;
}
It's not important to understand exactly what the code is doing here, but
just pay special attention to the fact that the code uses
partial derivatives
indirectly via the use of the GLSL fwidth() function. The code also has
access to the size of the texture in pixels (the texture_size parameter).
I've implemented this same kind of code many times in GLSL. It's low cost, it's largely scene-independent requiring no artist-configured tuning, and it works without issue.
I now want to implement this same algorithm for use as a shader in Blender. How difficult can it be?
Unfortunately, it turns out that, like most things in Blender, the wheels fall off as soon as you give them the slightest poke.
Blender doesn't expose texture size information in rendering nodes, despite
clearly having access to it internally. This means that you have to customize
each shader you have to work with whatever textures you have assigned. Blender
also doesn't expose clamp(), necessitating writing it by hand. This is easy,
but it's another mild annoyance to add to the pile. Blender doesn't expose
partial derivatives in any form. I couldn't find a reasonable alternative.
Last of all, you're forced to do all of this in an excruciating node/graph
based "programming" environment because Blender doesn't expose any kind of
text-based programming. This means that five lines of straightforward
GLSL code become a rat's nest of absurd graph nodes. This is ostensibly done
because apparently artists can't handle looking at a few lines of extremely
basic code, but they can somehow handle looking at an insane spiderweb of
graph nodes that utterly obfuscate whatever the original intention behind the
code was.
I admit defeat. This was the closet approximation I was able to get to fat pixel sampling:

The result manages to combine both blurriness and shimmering, providing the worst possible results.
Wishing a case of treatment-resistant haemorrhoids on all designers of node-based programming environments everywhere, I took a step back and wondered if there was a dumber solution to the problem.
The idea occurred to me that the issue is caused by scaling upwards: A single texel is sampled and repeated over a number of screen pixels, and it's ultimately this that causes the problem. What if, instead, we somehow scaled downwards?
I took the original 59x90 pixel art image, scaled it up to 944x1440, and
then rendered using straightforward bilinear filtering. The result:

Shimmering is almost entirely eliminated, and the sharp appearance is preserved. I suspect the effect is proportional to the degree of scaling; as long as the sampled texture is larger than it will appear onscreen, things work out. You wouldn't want to do this in a game engine or other realtime engine; noone wants to use up all of their precious texture memory on a few pixel art sprites. In an actual rendering engine, however, you would write the five or so lines of shader code and forget about it, and not have to deal with any of this.
Sometimes the dumbest solution is the best and only solution.
Blend file: fatPixels.blend
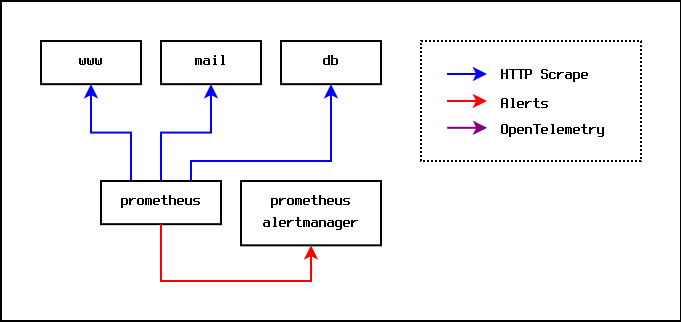
The traditional starting point for monitoring is to install Prometheus and have it scrape metrics from each machine being monitored. Each monitored machine runs a node-exporter service that exposes metrics over HTTP, and the central Prometheus server scrapes metrics from each node-exporter service every ten seconds or so.
The Prometheus server maintains its own persistent internal time series
database, and can produce pretty graphs of metrics on demand.
Additionally, the Prometheus server can be given alerting rules such that
it will generate alert messages when a given rule evaluates to true for
a specified time period. An example of this might be a rule such as
node_memory_available_percent < 10.0. Intuitively, this can be read as
"generate an alert if the amount of available memory on a node dips below
ten percent for a configured period". When an alert rule is triggered, the
Prometheus server sends an alert to an alert manager server. The alert
manager is responsible for routing alert messages to the people and places
that should receive them. For example, alert messages relating to the
node_memory_available_percent signal might be configured to be routed to the
email address of the hardware administration team.
The whole setup looks like this:
This works fine, but at some point you come across an application that uses OpenTelemetry. OpenTelemetry offers far richer monitoring signals; it offers logs, metrics (a superset of Prometheus metrics), and traces.
Applications send OpenTelemetry signals to a collector, which then batches and forwards the signals to various servers for storage and analysis. In practice, because they are free, open source, and can be self-hosted, those servers will usually be the various offerings from Grafana Labs.
Specifically, metrics will be sent to Grafana Mimir, logs will be sent to Grafana Loki, and traces will be sent to Grafana Tempo. On top of this, a Grafana server is run to provide a dashboard and to provide alerting.
The monitoring setup then looks like this:
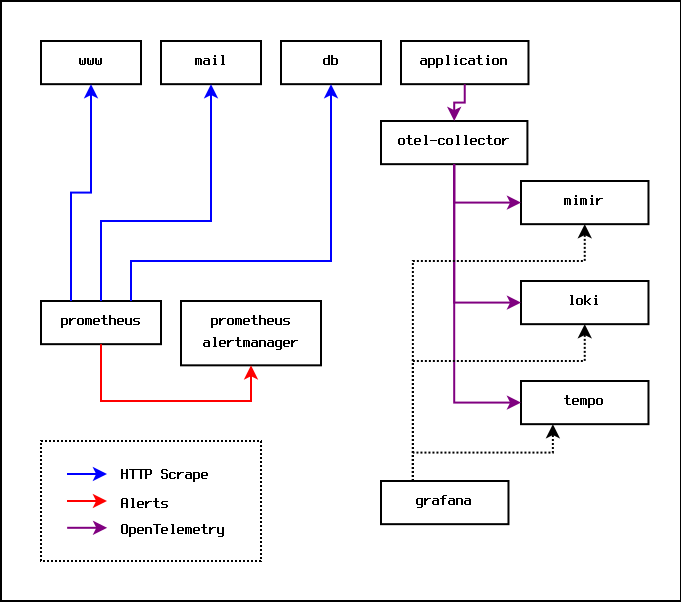
This is a problem, because now the metrics signals and the alerting rules are split between the Prometheus server, and the Grafana server. Some systems are producing Prometheus metrics that go to the Prometheus server, and some systems are producing OpenTelemetry signals that end up in the Grafana server(s).
It turns out that Grafana Mimir provides an optional implementation of the Prometheus AlertManager, and Prometheus provides a remote write option that can push metrics directly to Grafana Mimir. This means that you can remove the Prometheus AlertManager entirely, put all the alerting rules into Grafana Mimir, and set up one dashboard in the Grafana server. At this point, the Prometheus server essentially just acts as a dumb server that scrapes metrics and sends them directly to Mimir for storage and analysis.
The monitoring setup ends up looking like this:
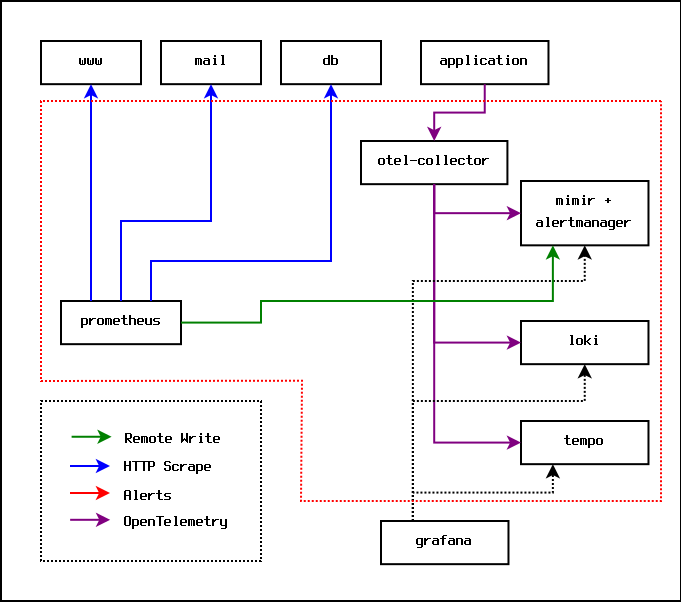
In practice, everything inside the dotted red line can run on the same physical machine. At some point, the volume of metrics will result in each of the Grafana components needing to be moved to their own separate hardware.
I was using Vultr DNS to serve DNS records for my various VPS instances up until the point where I wrote and deployed certusine to manage ACME-issued certificates using DNS challenges.
The issue with Vultr DNS at the time was that Vultr required the use of API keys to use their API. Normally, this wouldn't be a problem, except that it turned out that (at the time) there was no way to restrict the capabilities of API keys.
Consider this: You run a service on a Vultr-hosted VPS that has access to the API key. That VPS is compromised, somehow. The person compromising the VPS now has the capability to destroy all of your VPS instances with just a few API calls. Worse, the person compromising the VPS has the ability to start up and use any number of VPS instances (up to your account's configured spending limit).
Obviously, this was a level of risk that was unacceptable to me. I've been
using Gandi as a domain registrar for a very long time
now, and it turned out that they offered free DNS hosting along with an API
to manipulate records. I implemented support for Gandi DNS in
certusine and have been using it up until now.
Unfortunately, about a week ago, API calls started returning 500 error
codes. I contacted Gandi's technical support and they still haven't bothered
to respond.
It turns out that Gandi were bought by another company in early 2023, immediately jacked up prices, and have apparently let their technical side fall apart.
After trying and failing to find any other good alternative for DNS hosting, I accidentally stumbled across an article about Vultr sub-accounts. It turns out that Vultr have added a mechanism to create new users within a given account. The permissions of those users can be restricted in a fairly fine-grained way, and those users can have their own API keys. Essentially, I can create a user that only has access to DNS records and no other account functionality, issue them an API key, and then use Vultr's DNS service without the risk of a leaked API key being utterly catastrophic.
I'll be moving all of my DNS records back over to Vultr DNS, releasing a
new certusine version with improved Vultr support, and switching to
Porkbun as my domain registrar.